Daniel Guo
Software Engineer
View all authors

Create a pull request template

· 2 min read
Daniel Guo
Software Engineer

You can create a pull request template based on Creating a pull request template for your repository from Github:

  • you can put it in the repository's root directory: ./pull_request_template.md
  • you can put it in the repository's docs directory: ./docs/pull_request_template.md
  • you can put it in a hidden directory: ./.github/pull_request_template.md
  • you can put multiple pull request templates in a PULL_REQUEST_TEMPLATE subdirectory in the root director, docs directory, or .github hidden directory.

Benefits

Pull request (PR) templates ensure consistency in PR descriptions, clarify expectations, improve code quality, and ultimately, streamline the review process. By providing a structured format, PR templates reduce back-and-forth communication and save time for both reviewers and contributors.

  • Consistency: PR templates standardize the information included in each PR, making it easier for reviewers to understand the changes and assess their impact.
  • Clarity:: They prompt contributors to provide essential details about their changes, including the problem being solved, the approach taken, and any testing steps. This reduces ambiguity and misunderstandings.
  • Efficiency: By providing a structured format, PR templates reduce the time spent on back-and-forth communication, allowing reviewers to focus on the actual code changes.
  • Quality Control: Templates can include checklists for testing, documentation updates, and other quality-related tasks, ensuring that contributors remember to address these aspects.
  • Improved Documentation: Detailed PR descriptions, guided by the template, serve as valuable documentation for the codebase, making it easier for future developers to understand the rationale behind changes.

Template

Here is a pull request template that I shared within the team:

## Summary

_A brief description of changes and motivation behind them._

## Type of Change

- [ ] Bug fix (non-breaking change fixing an issue)
- [ ] New feature (non-breaking change adding functionality)
- [ ] Breaking change (fix or feature causing existing functionality to not work as expected)
- [ ] Documentation update
- [ ] Refactoring (no functional changes)
- [ ] Performance improvement
- [ ] Configuration/infrastructure changes

## Changes Made

- _your changes_
- ...

## Checklist

- [ ] Code follows project style guidelines
- [ ] Self-review completed
- [ ] Code is properly commented
- [ ] Tests added for new functionality
- [ ] Documentation updated (if needed)
- [ ] No merge conflicts

## Testing

- [ ] Unit tests added/updated
- [ ] Integration tests added/updated
- [ ] Manual testing completed
- [ ] N/A (docs etc.)

## Reviewer Notes

_Any specific areas you'd like reviewers to focus on_

Reference

Code Review: Why and How

· 5 min read
Daniel Guo
Software Engineer

What is Code Review?

Code review is a systematic examination of source code by team members other than the original author. It's a collaborative process where developers examine each other's code changes before they're merged into the main codebase. This practice involves reviewing pull requests, discussing implementation approaches, and ensuring code quality standards are met.

Why Code Review Matters

Quality Assurance

Code review acts as a safety net, catching bugs, security vulnerabilities, and performance issues before they reach production. Multiple pairs of eyes on code significantly reduce the likelihood of defects making it to users.

Knowledge Sharing and Learning

Every code review is an opportunity for mutual learning. Senior developers can mentor junior team members, while fresh perspectives often reveal better approaches or highlight assumptions that more experienced developers might overlook. This knowledge transfer strengthens the entire team's capabilities.

Maintaining Code Standards

Reviews ensure consistency in coding style, architectural patterns, and best practices across the codebase. This consistency makes the code more maintainable and reduces the cognitive load when working on different parts of the system.

Risk Mitigation

By having multiple developers familiar with different parts of the codebase through reviews, teams reduce the "bus factor" risk. Knowledge becomes distributed rather than siloed with individual developers.

Builds Team Trust

It promotes a culture of accountability, respect, and shared ownership.

How to Conduct Effective Code Reviews

For Authors

Prepare Quality Pull Requests

  • Write clear, descriptive commit messages and PR descriptions
  • Keep changes focused and reasonably sized
  • Include relevant tests and documentation updates
  • Self-review your code before submitting

Be Open to Feedback

  • View comments as opportunities to improve, not personal attacks
  • Ask for clarification when feedback isn't clear
  • Explain your reasoning when you disagree with suggestions
  • Thank reviewers for their time and insights

For Reviewers

Focus on the Right Things

  • Prioritize logic, architecture, and potential issues over minor style preferences
  • Look for security vulnerabilities, performance bottlenecks, and edge cases
  • Ensure code follows established patterns and conventions
  • Verify that tests adequately cover the changes

Provide Constructive Feedback

  • Be specific about issues and suggest solutions when possible
  • Use "we" language instead of "you" to foster collaboration
  • Prefer “Could we consider…” or “What do you think about…” instead of “This is wrong.”
  • Suggest improvements with reasoning, not authority.
  • Acknowledge good practices and clever solutions

Be Thorough but Timely

  • Review code promptly to avoid blocking team progress
  • Take time to understand the context and requirements
  • Don't rush through reviews, but don't let them drag on unnecessarily

Best Practices

Create a Positive Review Culture

Build Trust, Not Blame Code review should never be about pointing fingers or assigning blame when issues are found. Instead, it's about collective ownership of code quality. When bugs slip through review, the focus should be on improving the process, not finding who to blame.

Foster Learning and Growth Encourage questions and discussions during reviews. Junior developers should feel comfortable asking about unfamiliar patterns, while senior developers should be open to learning new approaches. Every review is a chance to share knowledge and grow together.

Maintain Team Unity Remember that everyone is working toward the same goal: building great software. Reviews should strengthen team bonds, not create division. Celebrate good code and creative solutions, and approach problems as challenges to solve together.

Technical Best Practices

Review Strategy

  • Review code in small, manageable chunks rather than massive changes
  • Focus on one logical change per pull request
  • Use automated tools for style and simple rule checking
  • Prioritize human review time for complex logic and architecture decisions

Communication Guidelines

  • Use clear, actionable language in comments
  • Distinguish between "must fix" issues and suggestions for improvement
  • Provide context for your feedback, especially when suggesting alternatives
  • Follow up on discussions to ensure resolution

Process Efficiency

  • Establish clear criteria for when code is ready to merge
  • Define who needs to review what types of changes
  • Set expectations for review turnaround times
  • Use draft PRs for early feedback on work in progress

Handling Disagreements

Embrace Healthy Debate Disagreements about implementation approaches are natural and valuable. When they arise, focus on the technical merits of different solutions rather than personal preferences. Document the reasoning behind decisions for future reference.

Escalation Path When reviewers and authors can't reach consensus, have a clear process for escalation. This might involve bringing in a senior developer, architect, or having a team discussion to make the final decision.

Building a Strong Review Culture

Psychological Safety

Create an environment where team members feel safe to make mistakes and learn from them. Code review should be a supportive process that helps everyone improve, not a gatekeeping mechanism that creates anxiety.

Continuous Improvement

Regularly discuss and refine your review process. What's working well? What could be improved? Are reviews helping the team learn and grow? Use retrospectives to evolve your practices.

Recognition and Appreciation

Acknowledge good reviews and thoughtful feedback. Recognize team members who consistently provide helpful insights or who have improved significantly through the review process.

Conclusion

Code review is far more than a quality control mechanism—it's a cornerstone of effective software development that builds stronger teams, better code, and shared understanding. When approached with the right mindset, code reviews become opportunities for learning, knowledge sharing, and collective growth.

Remember: we're all on the same team, working toward the same goals. Code review is how we support each other in building software we can all be proud of. Every comment, every suggestion, and every discussion makes us stronger as developers and as a team.

The goal isn't perfection in every line of code—it's continuous improvement, shared learning, and building software that serves our users well. When code review is done with trust, respect, and a commitment to collective success, it becomes one of the most valuable practices a development team can embrace.

References
Introduction to ADR

· 3 min read
Daniel Guo
Software Engineer

What and why

Architecture Decision Record (ADR) is a document that captures an important architecture decision made along with its context and consequences.

Architecture decision logs are answering the why? questions which are important in your designs, for example:

  • Why did you decide for Trunk-based branching strategy, rather than GitFlow?
  • Why do we use Plumi for infrastructure as code, while Terraform seems more popular and widely adopted?
  • Shouldn't we use a relational database instead of DynamoDB(NoSQL) as the source of truth for this system? ...

There are no reasons not to document the key decisions and provide short but solid justifications for your options (patterns, tech stacks etc.) chosen.

Choose an IaC tool

· 4 min read
Daniel Guo
Software Engineer

This is an ADR document that I shared within the development team, with updates. Please make the final decision based on your team's circumstances.

Context and Problem Statement

We need a standardized approach to managing our infrastructure across multiple environments. Our main criteria include:

Language Preference: Ability to use familiar languages.

Multi-Cloud Support: Flexibility to deploy across different cloud providers.

Imperative vs. Declarative: Balance between imperative programming and declarative configuration.

Ecosystem Maturity: A robust set of modules and community support.

The three tools under review are:

  • AWS CDK: Provides an imperative approach in familiar programming languages for AWS deployments.
  • Terraform (and tfcdk): Terraform offers a mature, declarative model with multi-cloud support. The tfcdk option brings a CDK-like abstraction to Terraform.
  • Pulumi: Similar to CDK in that it supports imperative programming languages but offers true multi-cloud capabilities.

Migrate from NPM to PNPM

· 3 min read
Daniel Guo
Software Engineer

The benefits of pnpm over npm

Performance

  • Faster installs: pnpm uses a content-addressable store and hard links files from the global store to node_modules, which avoids redundant downloads and file copying.
  • Parallelization: It aggressively parallelizes operations more than npm, especially for network I/O and linking.

Disk Space Efficiency

  • Content-addressable store: Dependencies are stored in a single location on disk (~/.pnpm-store) and symlinked into projects. This avoids duplication across projects, saving significant disk space—especially in monorepos.
  • No duplication in monorepos: All packages and versions share the same cache, which avoids redundant installations.

Strict and Deterministic Installations

  • Strict node_modules layout: pnpm prevents packages from accessing undeclared dependencies by default (unlike npm, which flattens dependencies).
  • Better adherence to package.json: If a dependency is not declared, it’s not accessible. This encourages correct dependency declarations.
  • Reproducibility: pnpm-lock.yaml combined with pnpm’s structure leads to more deterministic builds compared to npm.

Isolation and Compatibility

  • Isolated node_modules: No pollution from global installs or peer dependencies leaking into unrelated packages.
  • Better handling of peerDependencies: pnpm forces you to satisfy peer dependencies correctly, helping avoid runtime errors.

CLI Features and Ecosystem

  • Commands like pnpm why, pnpm m ls, pnpm m run in monorepos are fast and powerful.
  • Good integration with CI workflows and modern JavaScript tooling.

When to Use pnpm

Use pnpm if:

  • You’re working in a monorepo.
  • You want to optimize CI performance.
  • You care about strict dependency boundaries.
  • You want to save disk space across projects.

Migration Steps

Here is my migration experience for a Node.js application.

Install pnpm:

# on Mac
❯ brew install pnpm

# with node.js installed
❯ npm install -g pnpm

Steps


# Remove existing dependencies and the NPM lock file
❯ rm -rf node_modules package-lock.json

# Optional: clear .npmrc and .npm cache if they contain custom registry settings
❯ rm -rf ~/.npmrc ~/.npm

# Install dependencies
❯ pnpm install

Update Scripts

  • npm run test => pnpm test
  • npm start => pnpm start
  • npx prisma migrate dev --name "$1" --schema=app/prisma/schema.prisma => pnpm dlx prisma migrate dev --name "$1" --schema=app/prisma/schema.prisma

Update Dockerfile

Install PNPM and migrate related commands:

RUN npm install -g pnpm@latest-10

RUN pnpm install

RUN pnpm dlx prisma generate --schema=app/prisma/schema.prisma

CMD ["pnpm", "start"]

Update CI/CD

  • Use pnpm/action-setup
  • Use cache to reduce installation time
on:
- push
- pull_request
jobs:
deploy:
name: Deploy to AWS ECS - ${{ inputs.environment }}
runs-on: ubuntu-latest
environment: ${{ inputs.environment }}
steps:
- name: Checkout code
uses: actions/checkout@v4
with:
ref: ${{ inputs.branch }}

- name: Install pnpm
uses: pnpm/action-setup@v4
with:
version: 10
run_install: false

- name: Set up Node.js
uses: actions/setup-node@v4
with:
node-version: "22.x"
cache: "pnpm"

References

The Mac apps that I like

· 2 min read
Daniel Guo
Software Engineer

Maccy

Maccy is a lightweight clipboard manager for macOS. It keeps the history of what you copy and lets you quickly navigate, search, and use previous clipboard contents.

Project site: https://github.com/p0deje/Maccy.

Features:

  • Open source and free
  • Keyboard-first
  • Lightweight and fast
  • Secure and private
  • Options to past automatically and paste without formatting
  • It can ignore applications like password managers

Hammerspoon

It is an open source tool for powerful automation of OS X. You can write Lua scripts to control many aspects of your OS X environment.

I mainly use it to configure global shortcuts for applications (my config).

Project site: https://github.com/Hammerspoon/hammerspoon

Vim

Vim is a highly configurable text editor built to make creating and changing any kind of text very efficient.

I use Vim whenever possible, for example: VS Code (Cursor), Sublime Text, Intellij Idea etc (my config).

Project site: https://github.com/vim/vim

Rectangle

Move and resize windows in macOS using keyboard shortcuts or snap areas.

If you have a big screen, this app is very helpful and easy to divide the screen into different parts. Most used shortcuts:

  • Left Half/Right Half

  • Top Half/Bottom Half

  • Top Left/Top Right

  • Bottom Left/Bottom Right

Project site: https://rectangleapp.com

6 Ways to Deploy Your Node.js Application to AWS

· 8 min read
Daniel Guo
Software Engineer

Introduction

Deploying a Node.js application to AWS can feel overwhelming with so many options available. Whether you're building a REST API, GraphQL service, or full-stack application as part of a microservices architecture, choosing the right deployment strategy can significantly impact your application's performance, cost, and maintainability.

In this comprehensive guide, we'll explore six popular AWS deployment methods for Node.js applications, examining their trade-offs to help you make an informed decision. We'll cover everything from serverless solutions to container orchestration, with practical insights and cost considerations.

Key Factors to Consider

Before diving into specific deployment methods, consider these factors:

  • Application complexity and traffic patterns
  • Team expertise with AWS services and DevOps practices
  • Performance requirements (latency, throughput)
  • Budget constraints and cost optimization needs
  • Scaling requirements (horizontal vs vertical)
  • Operational overhead tolerance
  • Security and compliance requirements

1. AWS Elastic Beanstalk

AWS Elastic Beanstalk is a Platform as a Service (PaaS) that simplifies deployment and management of web applications. It automatically handles infrastructure provisioning, load balancing, auto-scaling, and application health monitoring.

Pros:

  • Rapid Deployment: Deploy with a simple eb deploy command or ZIP file upload
  • Managed Infrastructure: Automatically provisions EC2 instances, load balancers, and auto-scaling groups
  • Built-in Monitoring: Integrated with CloudWatch for application and infrastructure metrics
  • Easy Rollbacks: Simple version management and rollback capabilities
  • Cost-Effective: No additional charges beyond the underlying AWS resources

Cons:

  • Limited Customization: Less control over the underlying infrastructure configuration
  • Platform Restrictions: Limited to supported Node.js versions and configurations
  • Vendor Lock-in: Tightly coupled to AWS Elastic Beanstalk service
  • Debugging Complexity: Harder to troubleshoot when things go wrong

Cost Considerations:

  • Pay only for underlying EC2 instances, load balancers, and other AWS resources
  • Typically costs $20-200/month for small to medium applications

Use Case: Perfect for development teams wanting quick deployment without deep AWS expertise, prototypes, or applications with predictable traffic patterns.

2. AWS Lambda with API Gateway

AWS Lambda enables serverless computing where you run code without managing servers. Combined with API Gateway, it creates a powerful serverless API solution with automatic scaling and pay-per-request pricing.

Pros:

  • True Serverless: Zero server management and automatic scaling
  • Cost Efficient: Pay only for actual execution time (down to 1ms billing)
  • Automatic Scaling: Handles 0 to thousands of concurrent requests instantly
  • High Availability: Built-in fault tolerance across multiple Availability Zones
  • Integrated Security: Built-in integration with AWS IAM and other security services

Cons:

  • Cold Start Latency: 100-1000ms delay for infrequently called functions
  • Execution Limits: 15-minute maximum execution time, 10GB memory limit
  • Stateless Architecture: Requires external storage for persistent data
  • Complex Debugging: Distributed tracing and debugging can be challenging
  • Vendor Lock-in: Heavily tied to AWS Lambda ecosystem

Cost Considerations:

  • Free tier: 1M requests and 400,000 GB-seconds per month
  • Beyond free tier: ~$0.20 per 1M requests + compute time
  • Can be very cost-effective for low to moderate traffic

Node.js Specific Considerations:

  • Use Lambda Layers for common dependencies
  • Optimize bundle size to reduce cold starts
  • Consider using Provisioned Concurrency for consistent performance

Use Case: Ideal for microservices, APIs with variable traffic, event-driven applications, and cost-sensitive projects with sporadic usage.

3. Amazon EC2

Amazon EC2 provides virtual servers in the cloud with complete control over the computing environment. You can choose instance types, operating systems, and have full access to configure everything.

Pros:

  • Complete Control: Full access to the operating system and server configuration
  • Flexibility: Can run any Node.js version, custom software, or legacy applications
  • Predictable Performance: Dedicated resources without "noisy neighbor" issues
  • Cost Optimization: Reserved instances and Spot instances for significant savings
  • Hybrid Architectures: Easily integrate with on-premises infrastructure

Cons:

  • Operational Overhead: Responsible for OS updates, security patches, and maintenance
  • Scaling Complexity: Manual or complex auto-scaling setup required
  • Security Responsibility: Must configure security groups, firewalls, and access controls
  • High Learning Curve: Requires deep AWS and system administration knowledge

Cost Considerations:

  • t3.micro: ~$8.50/month (free tier eligible)
  • t3.medium: ~$30/month
  • Reserved instances: 30-70% savings for predictable workloads
  • Don't forget costs for storage, data transfer, and load balancers

Best Practices for Node.js on EC2:

  • Use PM2 or similar process managers
  • Implement proper logging and monitoring
  • Use Application Load Balancer for high availability
  • Consider using Auto Scaling Groups

Use Case: Best for applications requiring specific configurations, legacy systems, long-running processes, or when you need full control over the environment.

4. Amazon ECS with Fargate

Amazon ECS (Elastic Container Service) is a fully managed container orchestration service. AWS Fargate is a serverless compute engine that allows you to run containers without managing the underlying infrastructure.

Pros:

  • Serverless Containers: No EC2 instance management required
  • Easy Scaling: Automatic horizontal and vertical scaling
  • Service Discovery: Built-in service discovery and load balancing
  • AWS Integration: Seamless integration with VPC, IAM, CloudWatch, and other AWS services
  • Blue/Green Deployments: Built-in support for zero-downtime deployments

Cons:

  • Container Learning Curve: Requires Docker knowledge and containerization best practices
  • Cost Premium: Fargate is more expensive than self-managed EC2 instances
  • Resource Constraints: Limited to specific CPU/memory combinations
  • Debugging Complexity: Container debugging can be more complex than traditional deployments

Cost Considerations:

  • Fargate pricing: ~$0.04048 per vCPU per hour + $0.004445 per GB memory per hour
  • A typical Node.js app (0.25 vCPU, 0.5 GB): ~$15-30/month
  • ECS on EC2: ~30-50% cheaper but requires instance management

Node.js Optimization Tips:

  • Use multi-stage Docker builds to minimize image size
  • Implement proper health checks
  • Use Alpine Linux base images for smaller containers
  • Leverage Docker layer caching

Use Case: Perfect for containerized applications, microservices architectures, teams familiar with Docker, and applications requiring consistent deployment across environments.

5. Amazon EKS

Amazon EKS (Elastic Kubernetes Service) is a managed Kubernetes service that simplifies running Kubernetes on AWS without managing the control plane.

Pros:

  • Kubernetes Ecosystem: Access to the vast Kubernetes ecosystem and tools
  • Advanced Orchestration: Sophisticated deployment strategies, service mesh, and networking
  • Multi-Cloud Portability: Kubernetes knowledge transfers across cloud providers
  • Enterprise Features: Advanced RBAC, network policies, and compliance features
  • Managed Control Plane: AWS manages the Kubernetes control plane for high availability

Cons:

  • Steep Learning Curve: Kubernetes complexity requires significant investment in learning
  • High Operational Overhead: Complex troubleshooting and ongoing maintenance
  • Cost Complexity: Difficult to predict and optimize costs
  • Over-Engineering Risk: May be overkill for simple applications

Cost Considerations:

  • EKS cluster: $0.10 per hour (~$73/month)
  • Plus worker node costs (EC2 or Fargate)
  • Additional costs for load balancers, storage, and networking
  • Minimum realistic cost: $150-300/month

Use Case: Suitable for organizations already using Kubernetes, complex microservices architectures, teams requiring advanced container orchestration, or multi-cloud strategies.

6. AWS App Runner (Bonus Option)

AWS App Runner is a newer fully managed service that makes it easy to quickly deploy containerized web applications and APIs at scale.

Pros:

  • Simplicity: Minimal configuration required
  • Automatic Scaling: Scales based on traffic with no setup
  • Integrated CI/CD: Direct integration with source code repositories
  • Cost-Effective: Pay only for running applications

Cons:

  • Limited Customization: Less control compared to ECS/EKS
  • New Service: Limited track record and ecosystem
  • Regional Availability: Not available in all AWS regions

Use Case: Great for simple containerized applications that need quick deployment with minimal configuration.

Decision Framework

Choose based on your priorities:

🚀 Speed to Market: Elastic Beanstalk or App Runner 💰 Cost Optimization: Lambda (variable traffic) or EC2 (predictable traffic) 🏗️ Microservices: ECS/Fargate or Lambda 🔧 Maximum Control: EC2 or EKS 📦 Container Strategy: ECS/Fargate (simple) or EKS (advanced)

Updated Comparison Table

MethodEase of UseManagement OverheadScalabilityCostControlBest For
Elastic Beanstalk⭐⭐⭐⭐⭐⭐⭐⭐⭐⭐⭐⭐⭐⭐⭐⭐⭐Quick deployment, prototypes
Lambda + API Gateway⭐⭐⭐⭐⭐⭐⭐⭐⭐⭐⭐⭐⭐⭐⭐⭐Variable traffic, microservices
EC2⭐⭐⭐⭐⭐⭐⭐⭐⭐⭐⭐⭐⭐⭐⭐⭐⭐⭐⭐⭐Custom requirements, legacy apps
ECS/Fargate⭐⭐⭐⭐⭐⭐⭐⭐⭐⭐⭐⭐⭐⭐⭐⭐⭐Containerized apps, microservices
EKS⭐⭐⭐⭐⭐⭐⭐⭐⭐⭐⭐⭐⭐⭐⭐⭐⭐⭐⭐Complex orchestration, enterprise
App Runner⭐⭐⭐⭐⭐⭐⭐⭐⭐⭐⭐⭐⭐⭐Simple containerized apps

My Recommendation: ECS/Fargate

After working with various AWS services for over 3 years and deploying multiple Node.js applications, I recommend ECS with Fargate for most scenarios because:

✅ Sweet Spot Benefits:

  • Container-Native: Leverages Docker for consistent deployments across environments
  • Serverless Infrastructure: No EC2 instance management while retaining container benefits
  • AWS Integration: Seamless integration with ALB, RDS, ElastiCache, and other AWS services
  • Predictable Scaling: Reliable auto-scaling without cold start issues
  • Cost-Effective: Reasonable pricing for most production workloads

🎯 Perfect For:

  • Production Node.js APIs and microservices
  • Teams comfortable with Docker containerization
  • Applications requiring consistent performance
  • Projects needing good AWS service integration

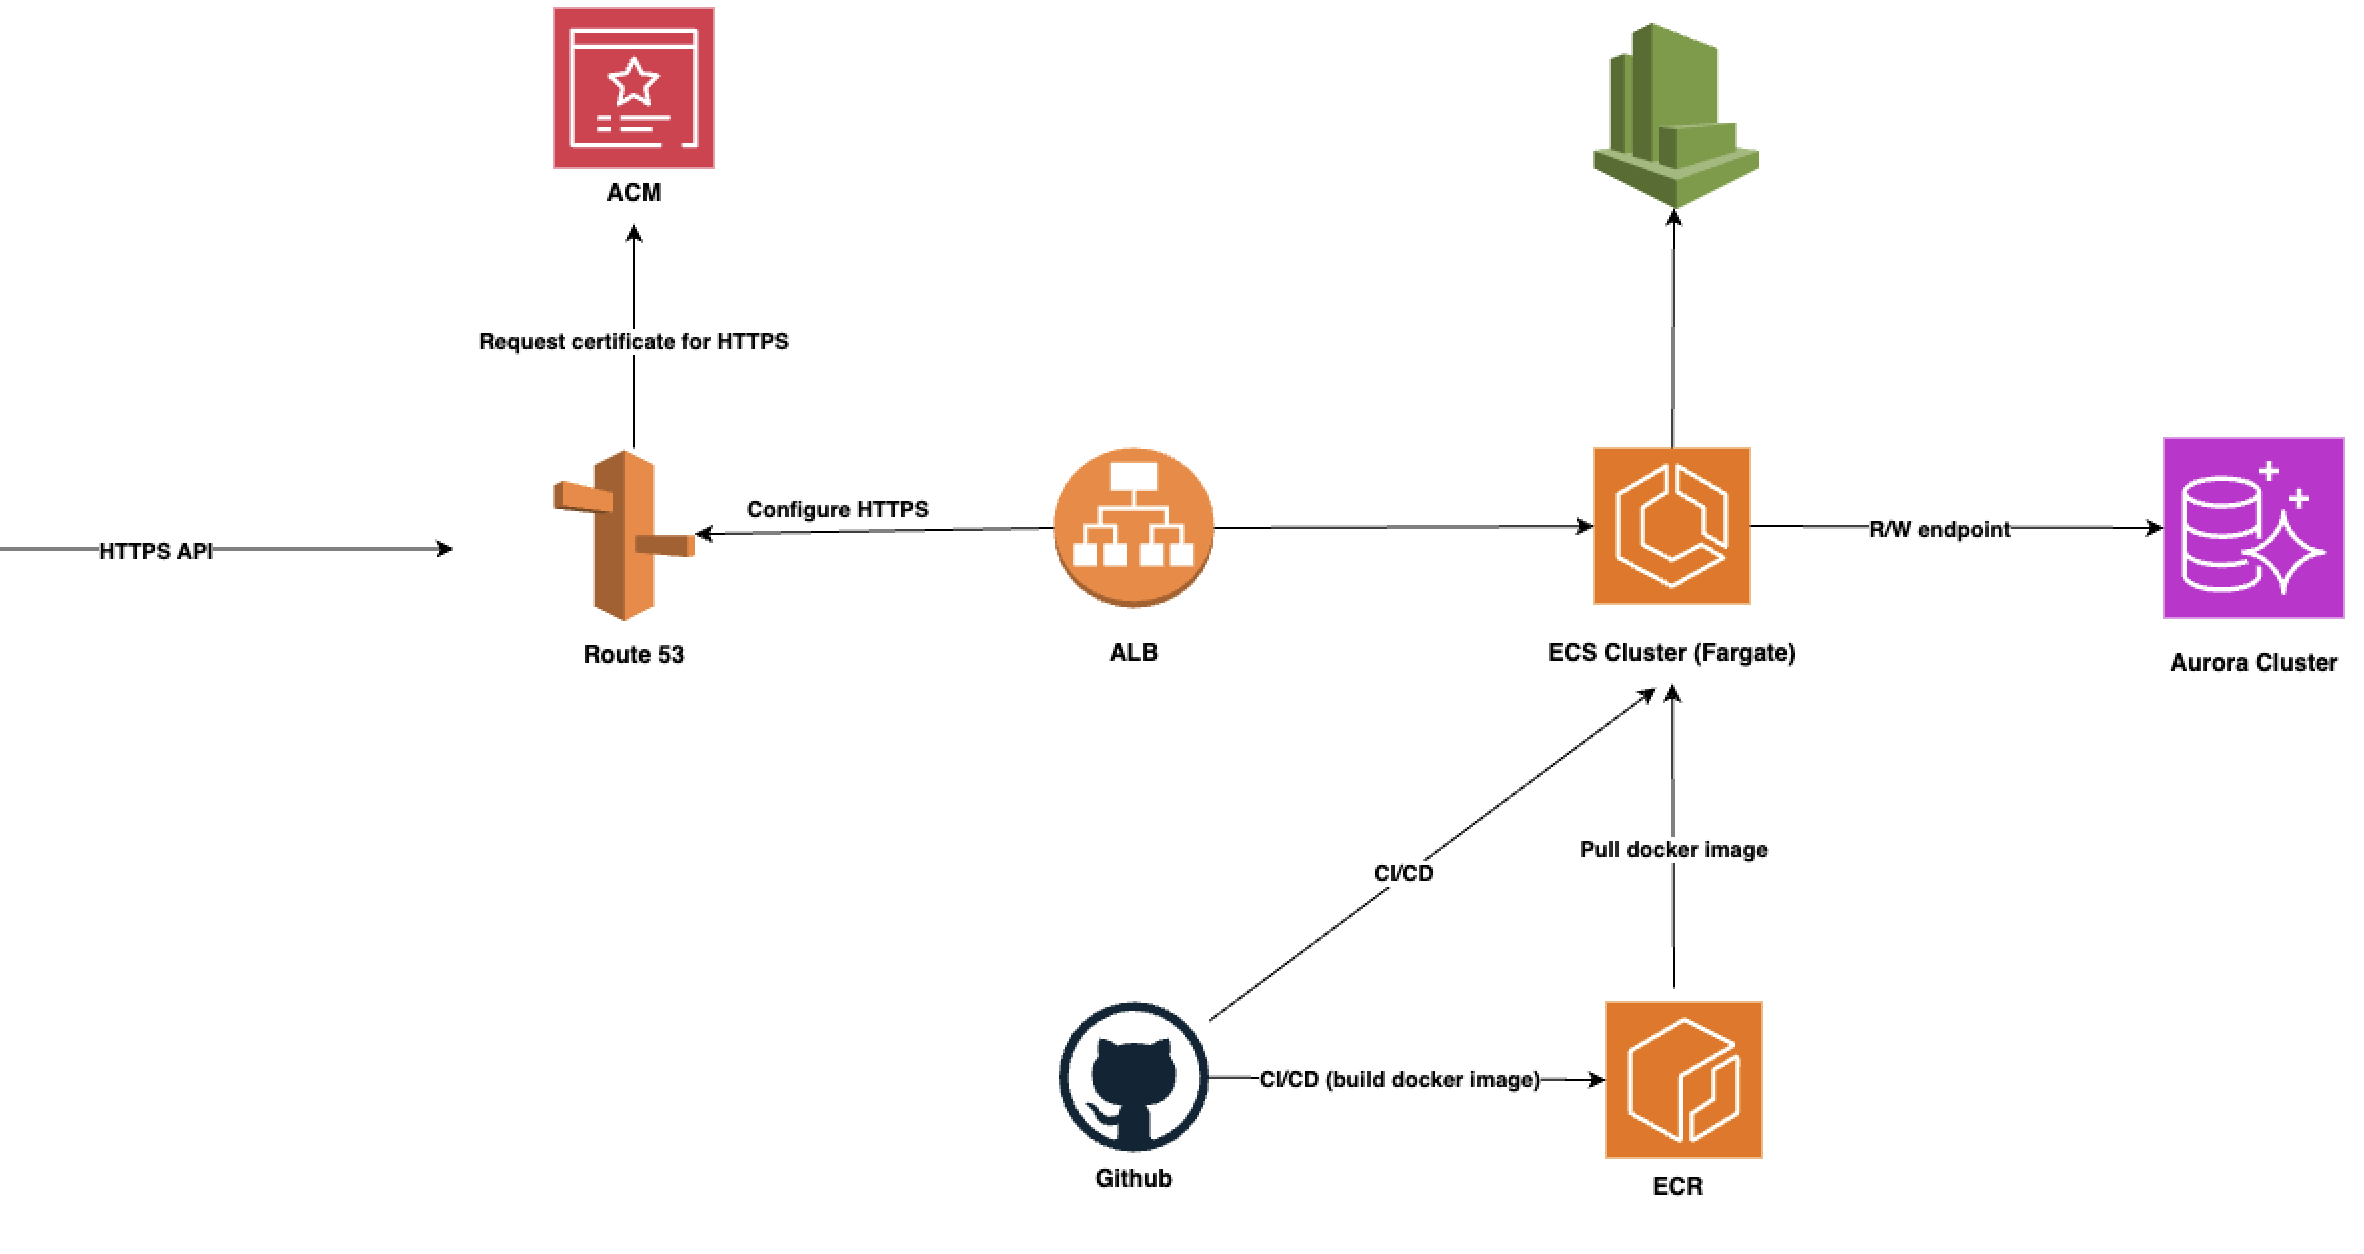
📊 Real-World Example: Here's the architecture I use for a Node.js REST API serving 10,000+ requests/day:

The following diagram shows my recommended ECS/Fargate deployment architecture: ECS Fargate Deployment

Conclusion

The right deployment method depends on your specific needs, team expertise, and project requirements. Start with your constraints (budget, timeline, team skills) and work backward to the solution that best fits.

For most Node.js applications, I'd recommend this progression:

  1. Prototype: Start with Elastic Beanstalk or App Runner
  2. Production: Move to ECS/Fargate for reliability and scalability
  3. Scale: Consider Lambda for specific microservices or EKS for complex orchestration

Remember: you can always start simple and evolve your architecture as your application and team mature. The key is to choose a solution that you can successfully operate and maintain long-term.